We’re going back to basics today! I’m really excited about this post because I’d love to share the joy of painting with everyone. Did I sound super Bob Ross there? Booyah!
Anyway, most of my artist friends, family, and acquaintances are typically familiar with acrylics and watercolours, but very few have experience with gouache. This is interesting because gouache is such a great in-between medium and can be so much fun to work with. Plus, with acrylic gouache gaining accessibility, there’s a perfect paint for every artist out there!
Before we get into it, I link to products throughout this post. I’m not affiliated with any product or brand, and am not being compensated for my recommendations. These are just art supplies I use and love.
Also, I don’t go into detail about oil paints. There are a lot of reasons why oils are awesome, like the depth of colour you can achieve, the opacity, and the basically endless blending time. But I have ADHD, so waiting for stuff to dry isn’t my strong point. And boy, does oil take forever to dry (especially if it has been applied impasto style). This is the only reason why I avoid oil paints—I want my painting and I want it now. If, however, you’d like me to write one of these with the focus on oils, please drop me a line in the comments and I’ll see what I can do. 😁
The Difference Between Acrylic Paint, Watercolours, and Gouache
Acrylic paint
* Pros
Versatile, fast-drying, flexible, and opaque—it’s no wonder most artists start their creative journey here.
Acrylic paints apply easily and can be blended, layered, and altered by mixing in various media. It will adhere to a great variety of surfaces, from paper to glass to fabric and almost everything in between, and doesn’t require setting or varnishing like some other paints. And as a bonus, acrylics don’t cost an arm and a leg!
There are hundreds of speciality acrylics on the market. Paints that offer specific effects or finishes are everywhere, so if you want your acrylics to puff, crackle, glow in the dark, glitter, and make you a cup of coffee, you can probably run to your local craft store and find it. 😉
Of all the kinds of paints out there, I find the least difference between student-quality and professional-quality acrylics. Cheap acrylics will probably require more layers to reach complete coverage, they’ll likely dry shinier, and they tend to streak more. But it’s not the same mind-blowing level-up you might experience when working with other kinds of pro-quality art supplies.
Though there certainly are techniques that will amplify the acrylic experience, no technique is necessary to start. It’s painless to paint over mistakes, highlights are easily added on top of darker shades, and it’s totally possible to create great art while learning more about this medium.
My favourite brand is Liquitex Basics Acrylic, which I can pick up at Michaels for around $9 per 118 ml tube. The trick is to wait for sales, though! I’ve never paid more than $5 per tube. 😉
* Cons
Because acrylic paints are so super versatile, they’re basically plastic. This means that the finish often has a shiny or rubbery quality, which is a big turnoff for many artists.
Also, the fast-drying quality means blending has to happen quickly, and even if an agent slowing the drying process is mixed into the paint, acrylics never offer the same blending capability one would get from oil paints, for example. Acrylics also dry darker than they look when wet, which can complicate colour matching.
Acrylics adhere to almost any surface, as long as it has tooth (which means the surface must have some texture for the paint to cling to). If an artist wants to paint on smoother surfaces like glass or metal, they must lightly sand their canvas before they can begin, or the paint will peel or crack. And even then, varnish might be necessary to set the finished artwork.
Acrylic paintings can last a few decades, but the paint will fade in sunlight or might crack if the canvas is handled too often. If you’re looking for something that will last forever, oil paints will be your best bet.
Watercolours
* Pros
These are fluid paints with a lot of movement and transparency.
Because the paint is activated with (or mixed with) water, the range of tonal values one can achieve is almost endless. And thanks to its transparency, watercolour layers beautifully and gains vibrancy and depth with each added layer.
We can also achieve fabulous effects by repelling paint with the wax resist technique, by adding substances like coarse salt or vinegar to the paint before it dries, or by blotting wet paint with clingfilm or paper towels.
Watercolours work well with most other media. Gel pens, coloured pencils, pastels, acrylics, gouache, and markers (among other things) are almost always part of the watercolourist’s arsenal.
In terms of cost, you can pick up a decent starter set for a good price. I highly recommend the Winsor & Newton Cotman Pocket Watercolour set (which I review in this post). This 12-colour set includes a paintbrush and comes in at around $40. I personally prefer cakes instead of tubes, as I’m forever dispensing either too much or not enough paint. I hate wasting paint because I’m not good at estimating how much I’ll need. If you’re looking for tubes, though, I’ve heard good things about this set. (It is totally possible to create watercolour cakes from paint in tubes, but I’m too lazy. I find it easier to purchase ready-made cakes.)
If you’re interested in watercolour pencils, I still adore the Farber-Castell Albrecht Dürer Artists’ Watercolour Pencils. I’ve had my set since 2017 and it’s still going strong; I’ve only replaced the white pencil in all that time. I can’t actually find my exact set for sale in Canada, but the 24-piece set retails for about $60 on Amazon. Expensive, but really fantastic long-term value.
* Cons
I wouldn’t say it’s impossible to attempt watercolours without understanding the techniques, but a basic understanding will certainly help newcomers avoid frustration.
Pigment can’t be effectively lightened once painted, so the watercolourist must always be conscious of the highlights in works in progress. It is important to paint from the lightest to the darkest hue, building each colour to the right intensity. And though slight errors can be lightened by painting over the area with water, the pigment will never fully vanish.
Watercolours always dry lighter than they seemed while wet which, again, can complicate colour matching.
Unlike acrylics, there’s a noticeable difference between student and artist-quality watercolours/watercolour pencils. The artist-quality sets are more pigmented, which means you’ll need less paint to achieve the same vibrancy. Besides that, inexpensive watercolours tend to splotch or flake off the page once dry. It might seem more attractive to pay $20 for 20 colours instead of $40 for 12, but in the long run, the more expensive set will last longer. Cheaper watercolour pencils tend to have a waxy coating that doesn’t totally dissolve (or at all in some cases) once water is added. This means the colours won’t flow into each other or blend, and won’t have that dreamy watercolour look in the final artwork.
Watercolour is an expensive hobby. As I mentioned earlier, most watercolourists add other media to their work. I couldn’t survive without my white Gelly Roll or chalk pastels, for example. Some artists also prefer to seal their work with a varnish for extra protection, and framing almost always involves glass. And of course, watercolour can’t be applied to just any surface, which brings us to the next segment.
Watercolour Paper
The best watercolour paper is cotton-based, as the fibres absorb more moisture and stay damp longer, which allows extended blending time. They also tend to pill less than non-cotton options, so this is the optimal paper for using wet-on-wet techniques.
The alternative is paper made of cellulose. This kind of paper is better suited to techniques that don’t require as much water as wet-on-wet, as cellulose isn’t as absorbent or heavy as cotton. This kind of paper might warp even when stretched.
Stretching is the process of wetting watercolour paper, laying it out on a flat surface, smoothing it, taping down the edges, and leaving it to dry. A time-consuming process for sure, but one that eliminates the odds of buckling once you apply paint to it.
Some artists use washi tape for stretching, but I personally prefer painter’s tape as I find it less likely to lift that first layer of paper upon removal. That said, I’m a very lazy painter, and will only stretch paper for commission work. Art I make for myself is always warped, but I have a hack! I sandwich the artwork between two sheets of printer paper, set the iron on low, and flatten those babies like pancakes. 🤣
It’s quite easy to overwork the paper, especially in the early stages of learning the medium, which will lead to pilling or tears. Because watercolours aren’t opaque, overworked patches can’t be hidden beneath thick paint.
Watercolour paper is typically acid-free, which plays an important role in maintaining the pigment and slowing colour fade. A combination of high-quality paint and paper can help an artwork survive for centuries.
When it comes to watercolour supplies, paper is an investment. Even children’s watercolours can look passable on quality paper, but the highest grade paint won’t hide the pilling or warping of cheap paper. Cotton-based paper is the most expensive and can retail at $50 plus per book, while cellulose-based paper is available anywhere from $10 per book upwards. I like the Strathmore 400 series for everyday use.
Gouache
* Pros
Like watercolours, gouache (pronounced gwash) is a water-soluble paint that dries velvety matte. But like acrylics or oils, it is opaque. This makes gouache super fun to work with, because you can achieve those dreamy watercolour effects and the opacity associated with acrylics.
Thanks to large pigment particles and chalk added to the formulation, gouache is an extremely vibrant paint. This intense pigmentation makes gouache a great companion for darker canvas or paper, which allows us to create striking, bright compositions.
Gouache is completely reactivated with water. That means you can smooth out gradients or soften edges after the paint has dried—all you need is a brush and some water.
Reactivation means prolonged blending times. We can also remove (slight) stains, just like with watercolours. But, like with watercolours, no mistake can be completely erased as the pigment will stick to the page.
Gouache can be applied to canvas and paper, works well in journals and scrapbooks (because it won’t seep through the paper and stain what’s beneath), and can even be layered over acrylics or watercolours.
Once dry, gouache has tooth, so your pens, pencils, etc will adhere to the paint. Even paint markers work, and if the gouache happens to transfer to the nib of your marker, you can easily clean it by drawing on another surface until clear.
I’ve been using Mont Marte’s Painter’s Gouache. I can’t find my exact set in Canada, but this 24-piece set is similar and retails for only $23.99. It’s a good starter set which allows a person to get a feel for the medium without paying an arm and a leg. If you can afford to spend a bit more though, I’ll always recommend Winsor & Newton products, like this 10-piece set for $30.
As I mentioned at the start of this post, you can also purchase a mixture of gouache and acrylic paint. Acrylic gouache is the best of both worlds—the flowy gouache-ness paired with the non-reactivation of acrylics. A polymer element added to the formulation of this paint makes it more durable and less likely to flake, while also allowing the artist the option of using the paint straight out of the tube or thinning it with water.
I’ve had no luck finding acrylic gouache readily available in Canada, so I haven’t had the chance to try it out yet. Liquitex makes various acrylic gouache sets that are available on Amazon. They start around $64 for 6 100ml tubes, so once I have the spare cash, I’ll get myself a set and let you know what I think!
* Cons
The fact that gouache can reactivate is both pro and con. The risk of muddying your work in progress is quite real, because every subsequent layer will reactivate what has been painted below. If you’re not careful and deliberate in your painting, colours not supposed to blend will turn to greige.
As an extension of the above point, gouache paintings shouldn’t be varnished. Any liquid will reactivate the paint. So, while all artworks must be stored in a dry, cool place, dry storage is imperative for gouache works.
The chalk element is another pro and con, as it can become brittle and flake as it dries. Adding the right amount of water to the paint before using it often helps avoid this issue, but there’s no formula to help us calculate how much the right amount is.
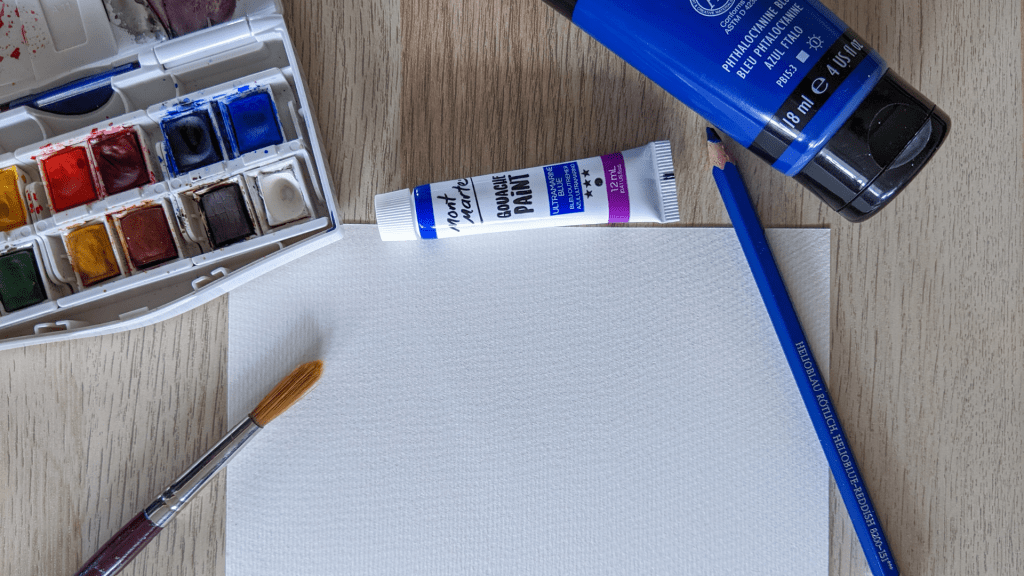
Swatches
I chose the most similar blue shades between my watercolours, gouache, and acrylics and swatched them in a single and two layers. I used a round, natural hair paintbrush, much better suited to watercolours or gouache than acrylics, but I figured this exercise would work best if I kept all the variables the same.
From left to right, top to bottom:
- Winsor & Newton Cotman colours in Ultramarine
- Farber-Castell Albrecht Dürer Watercolour Pencil in Helioblue-Reddish (and I also included an example of the typical pencil pressure I would use)
- Liquitex Basics Acrylics in Phthalocyanine Blue
- Mont Marte Gouache Paint in Ultramarine Blue (and I also included a swatch of the paint used straight from the tube)

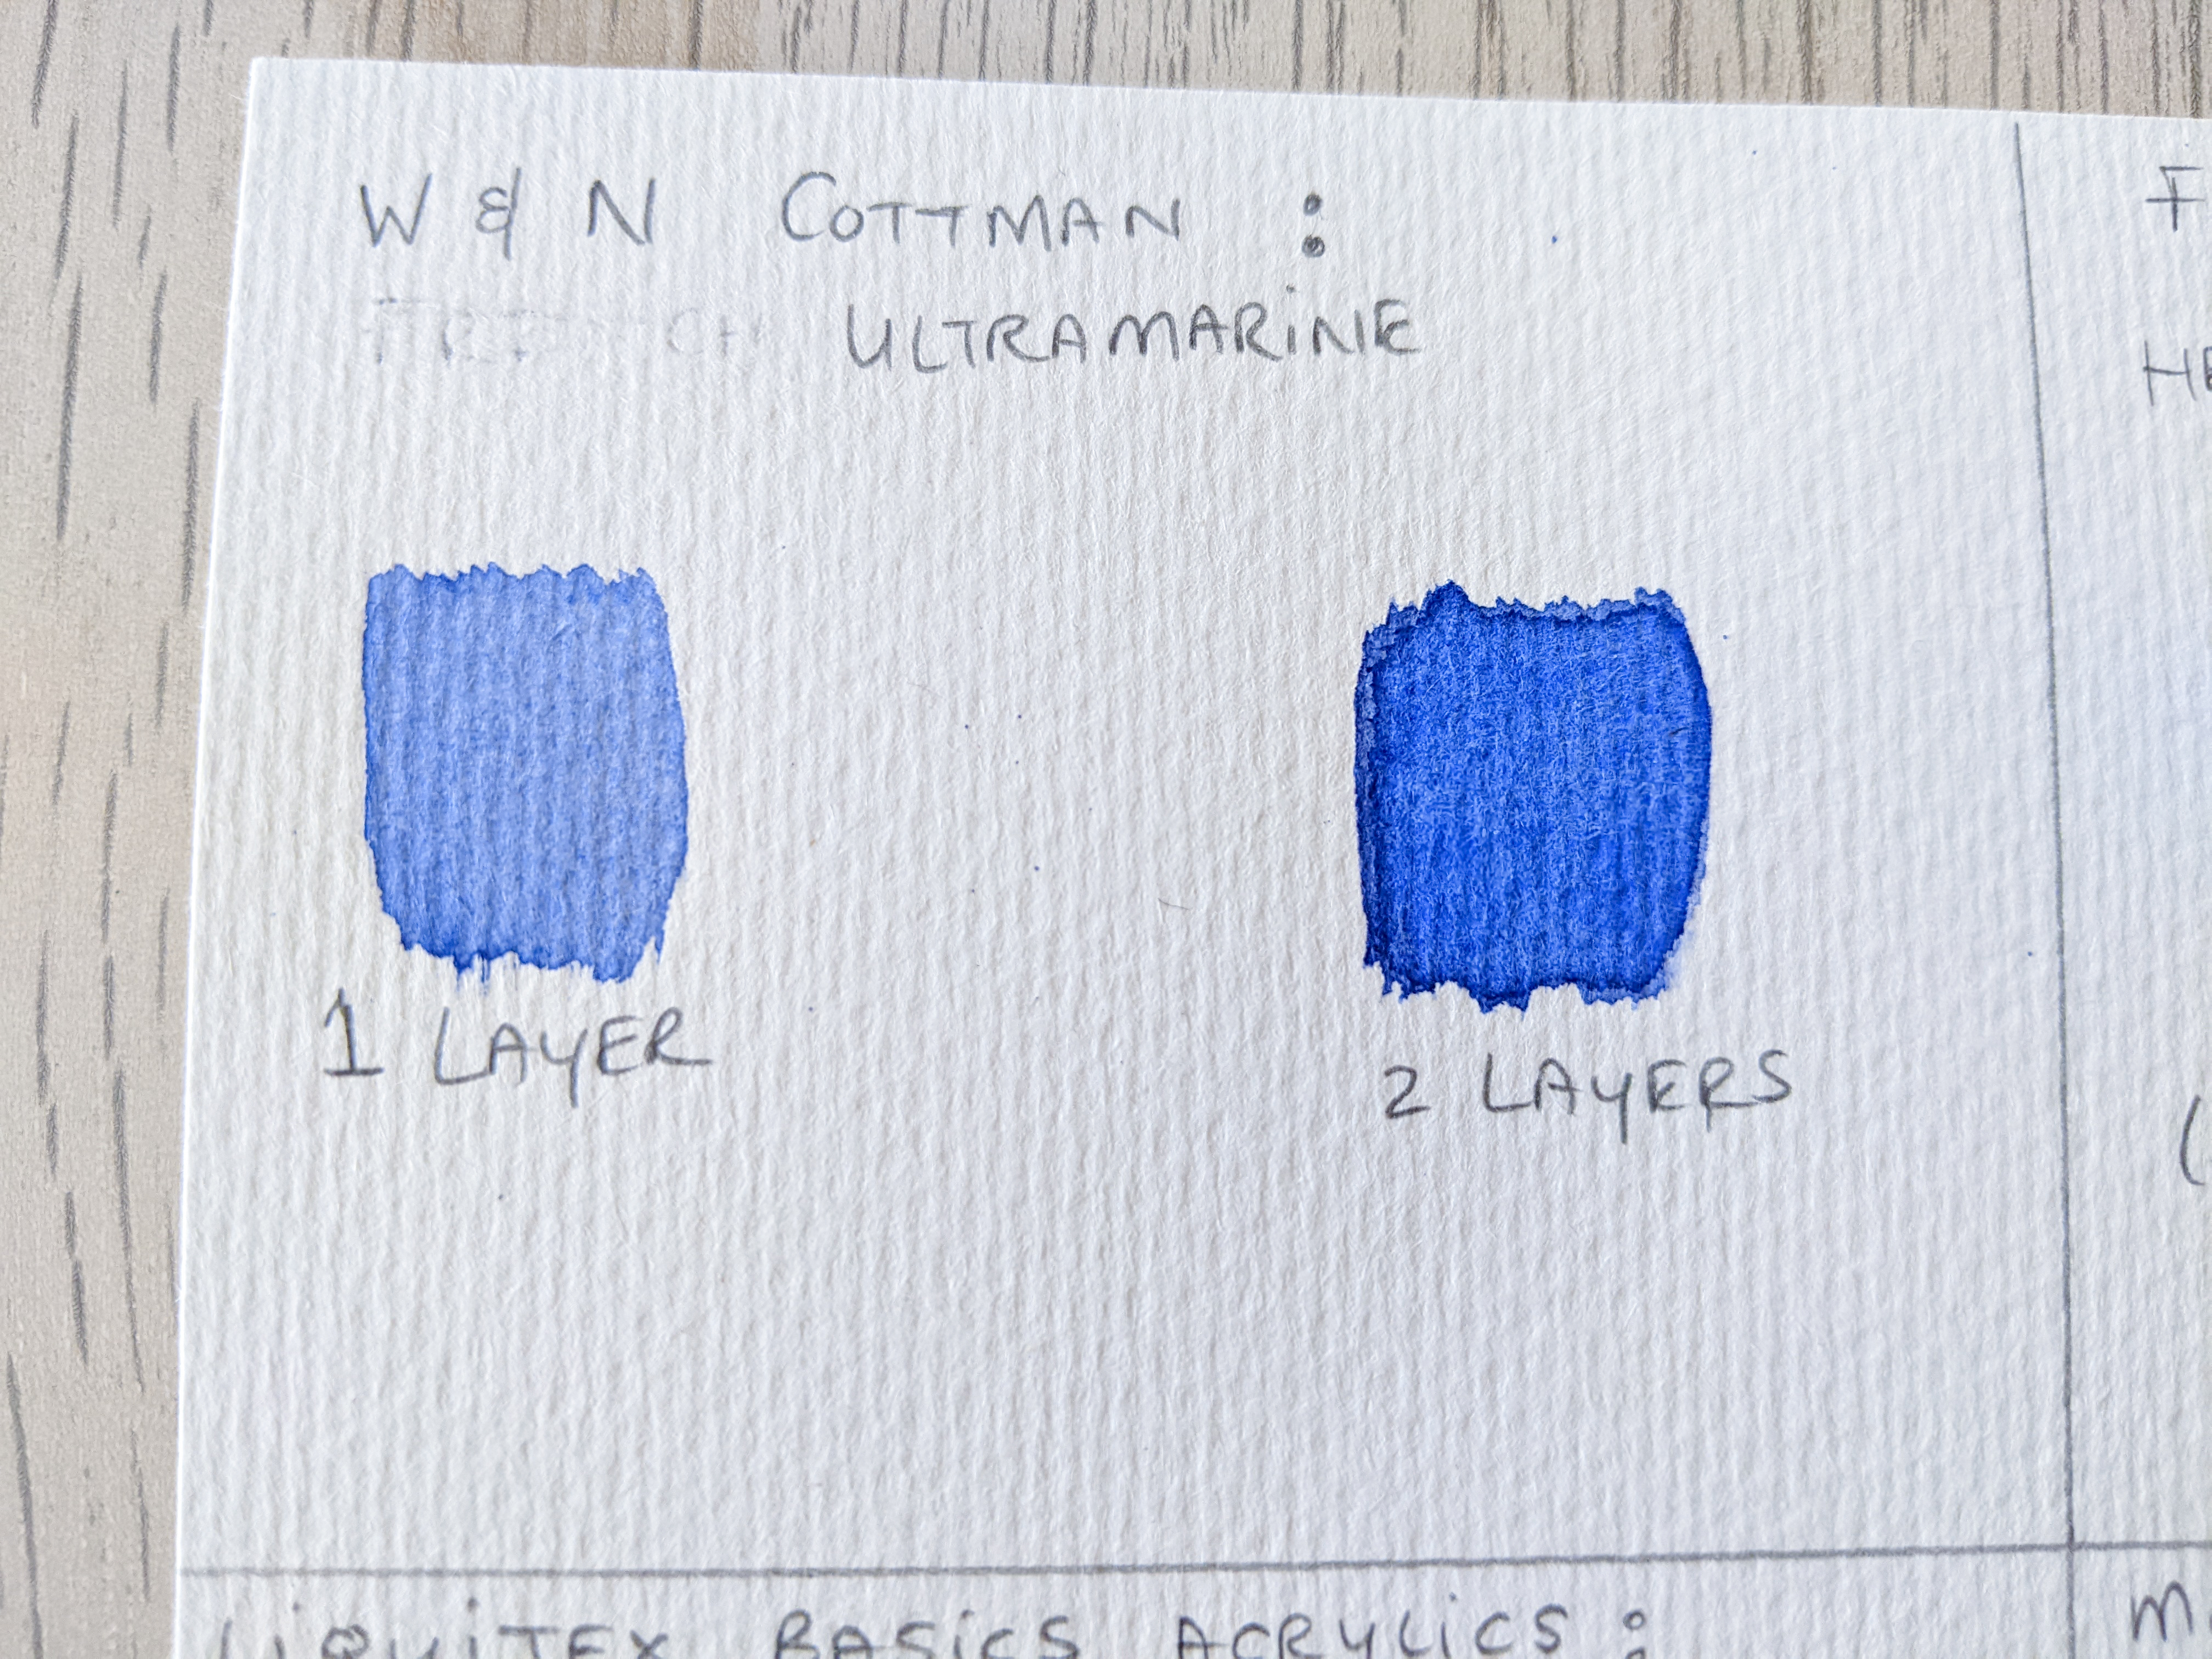


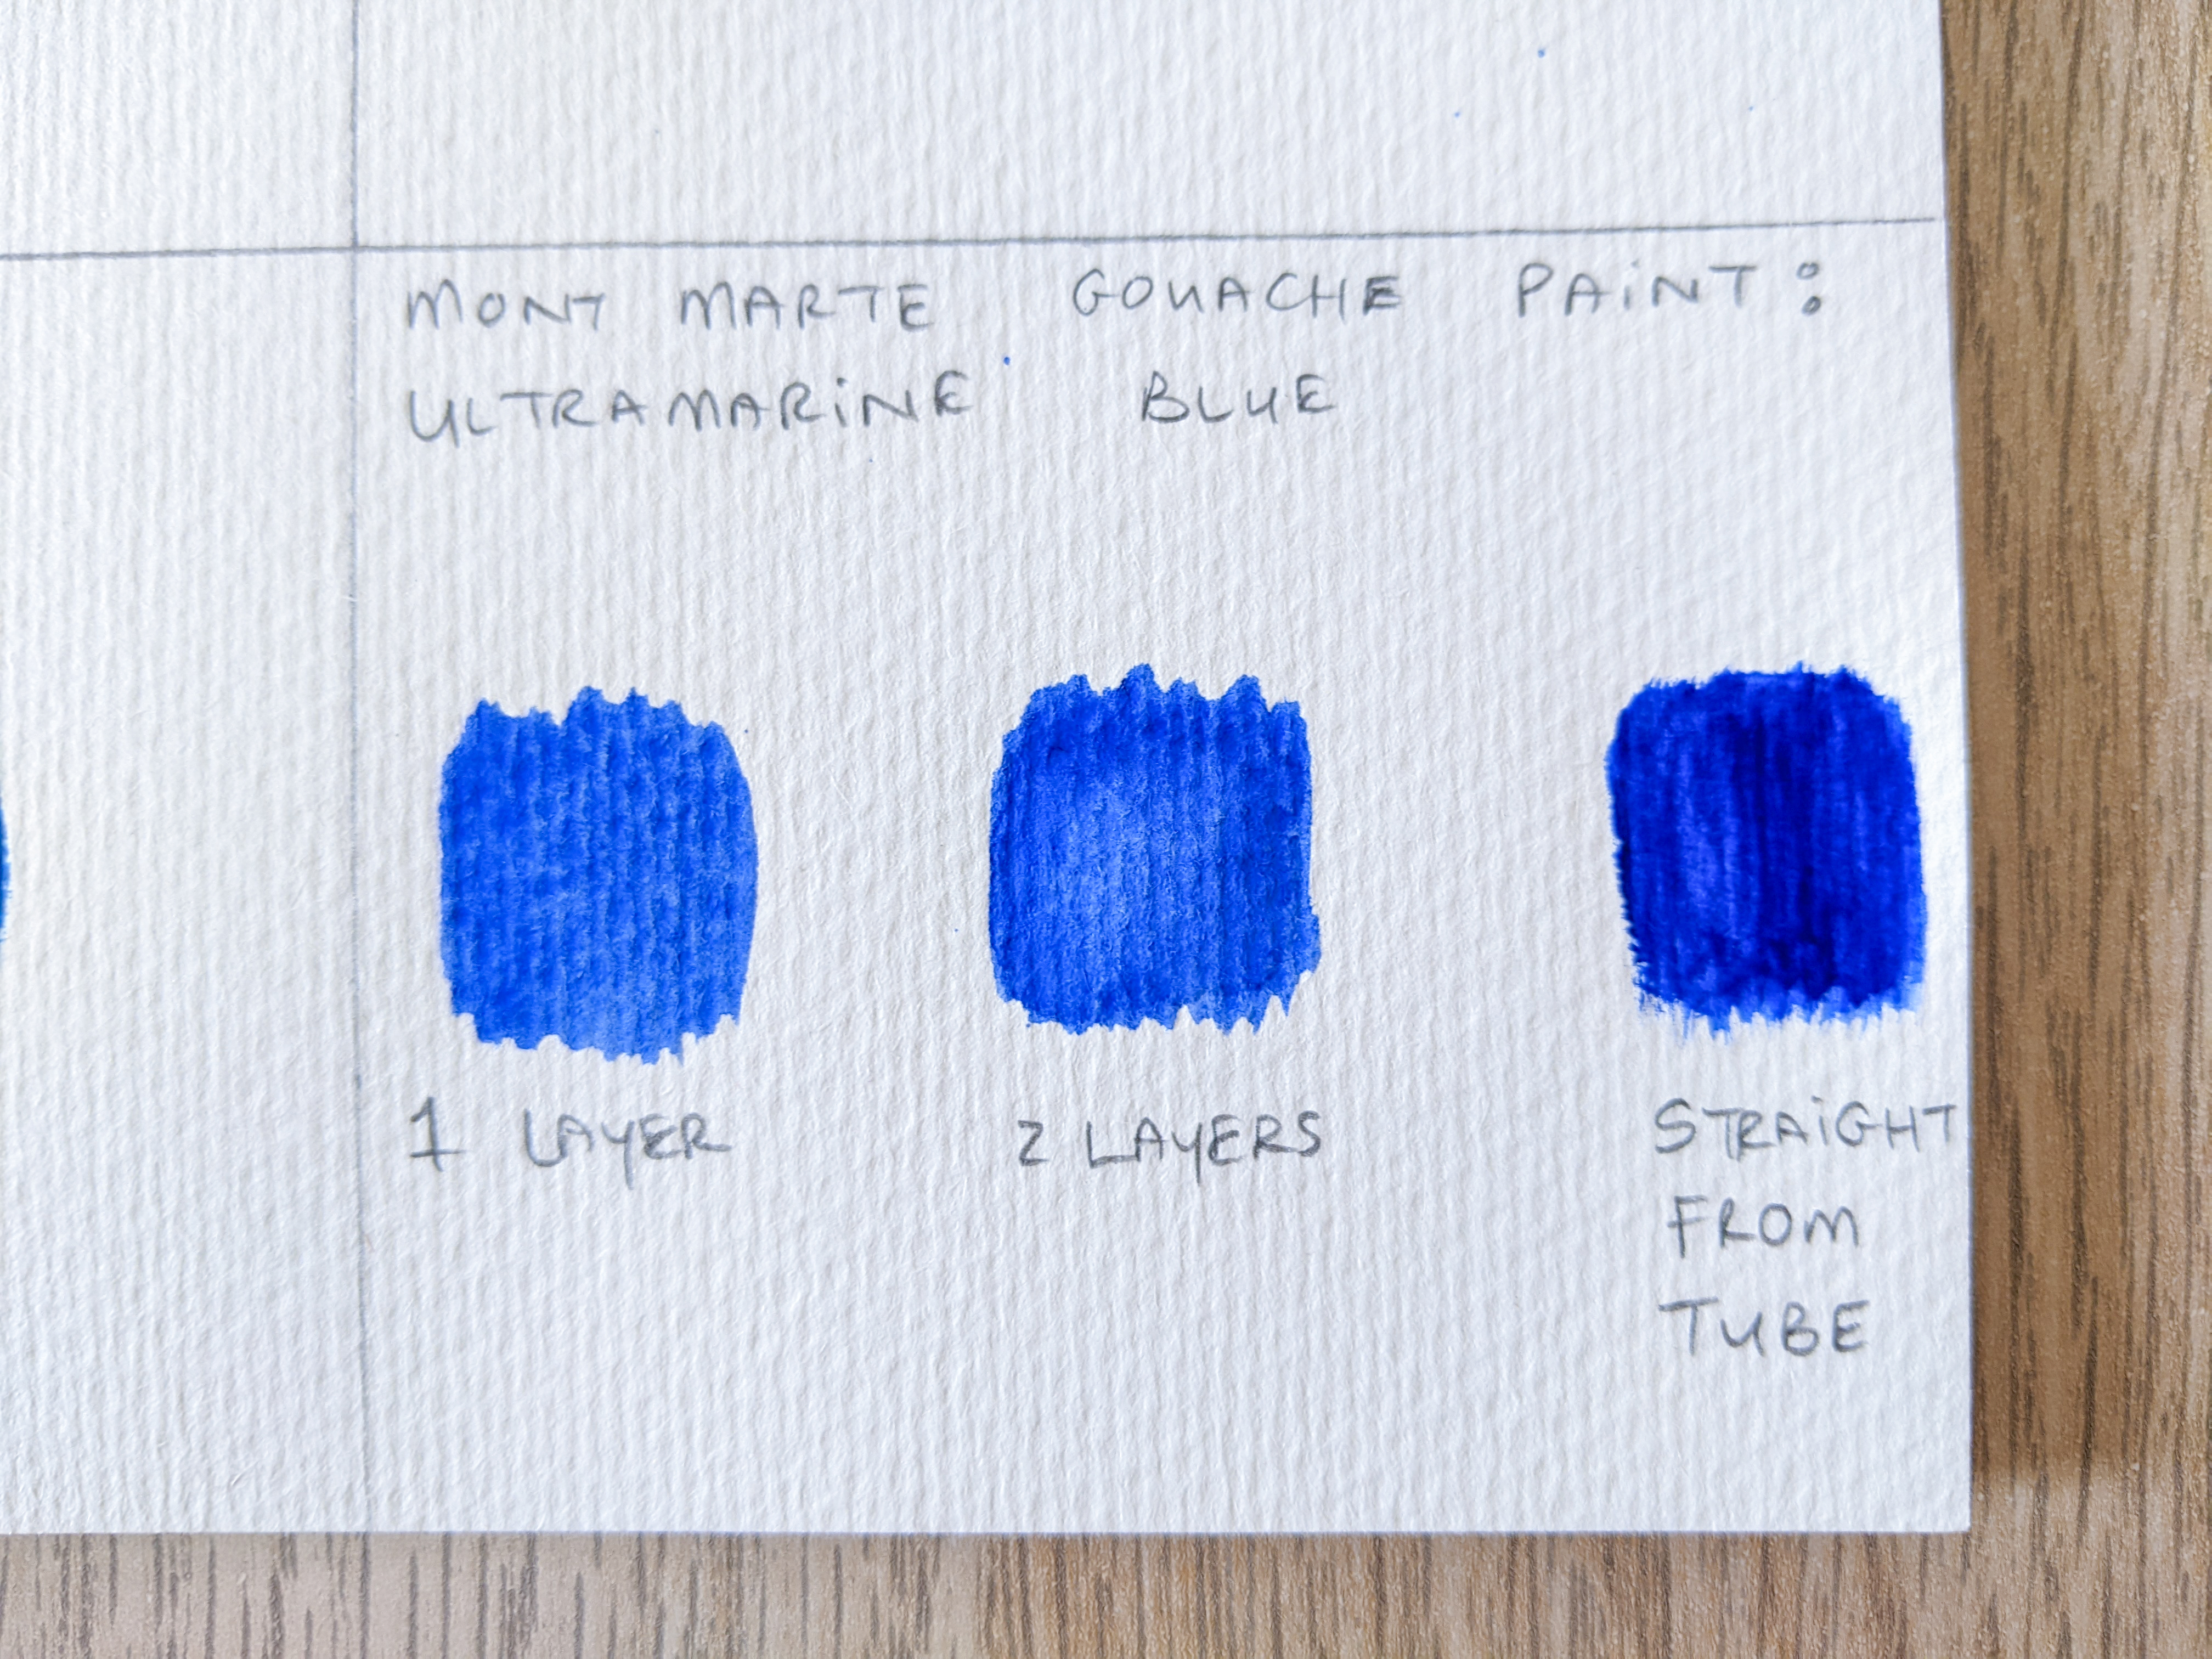
The watercolours and watercolour pencils turned out to be so similar that you almost can’t tell the difference between them at a glance. But when you compare the top and bottom swatches, the differences between acrylics, gouache, and watercolours really shine.
The acrylics photographed much more streaky than they look IRL, but part of the reason they streaked in the first place is because of the paintbrush. A flat brush would’ve worked much better here.
I hope this post inspires you to try a new paint media! Please don’t hesitate to share photos of your WIP’s in the comment section.
Yolandie


Let’s Chat!