
Inspired by the snow and the Rocky Mountains, I painted a little watercolour a few weeks ago. The feedback was really positive, so I figured I try something similar and make it a tutorial for you at the same time.
This is a super easy project that will make an awesome gift too. So let’s get right to it.
You’ll need:
- Watercolour paper.
- Watercolour pencils (or paint) in light ultramarine, ultramarine, helio-blue reddish, dark indigo, cadmium yellow, dark chrome yellow, medium purple pink, and mauve.
- White acrylic paint or gouache.
- Paintbrushes.
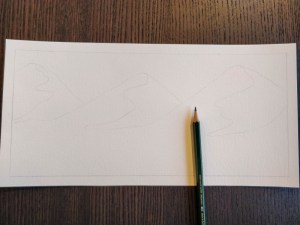
Step One:
Lightly plot out the shape of your mountains and mark the area where your shadows will fall. This is basically just a squiggled line that starts at the mountain peak and curves its way around halfway from the side of the mountain.
Step Two:
With the light ultramarine pencil, colour the shadowy side of the mountains. If you’re using paint, go ahead and paint now. 🙂 Also add small shadows on the sunny side of the mountain, just to add some depth. You could just leave it white too, though I’ve learned through trial and error that it looks less realistic that way.

Step Three:
With water, paint over the parts you coloured in step two. I picked up some pigment from the pencil’s tip and added the pigment to the damp paper right after applying the water, just to save time. It’s the lazy way to do it, if I’m being honest. 😜 Technically, it’s better to wait for one layer of paint to dry before you add another to prevent overworking the paper. Still, this worked.


Here’s a quick comparison of a single layer of paint and two layers. This is just to show any newcomers (welcome!) how big a difference it can make to layer watercolours.


Step Four:
With the ultramarine pencil, colour the sky. I used a gradient from dark around the painting’s border to lighter closer to the mountains.


Step Five:
Paint the skyline with water. To achieve a soft gradient, use straight swiping motions that keep most of the pigment at the top of the page, and simply add water as you work your way down.

Step Six:
Picking up pigment directly from the tip of the helio-blue reddish pencil, paint a tree. I have a quick tutorial on painting trees here. The farther back a tree is in the painting, the smaller and lighter the colour will be. For a lighter wash of paint, just add more water to the brush. Closer trees should be bigger and darker, with a little more detail added the nearer they come to the foreground.


Keep on going until you’ve achieved the look you want.
Step Seven:
Now we’re going to use the same technique to add large trees to the foreground, using the dark indigo pencil. As these trees are the closest, it’s important to keep working at them until they’re nice and pigmented. A few layers might be needed to achieve that.


At this point, the painting seemed too blue to me, so I added more colour to the background. The blues do work though, so feel free to skip step eight to ten, and head right into step eleven if you want to.
Step Eight:
Add the cadmium yellow, dark chrome yellow, medium purple pink, and mauve to the skyline. The idea is to create a sunset-like gradient, so focus the lightest yellow around the mountains, then add the darker yellow, purple pink, and finally the mauve at the highest point.

Step Nine:
Add water to the new sky colours, blending everything together subtly.


Step Ten:
Add light, watered down highlights to the mountain using the cadmium yellow pencil. I did this by picking up pigment directly from the pencil tip, but you could just as easily plot out where the highlights should go by colouring first, then painting with water. In an ideal world, this step would be completed before the trees are painted in, but art is fluid, and sometimes you only realise something doesn’t work quite as you wanted it to when you’ve actually tried it.

Step Eleven:
This is the last step, and is the easiest. With white acrylic paint or gouache, paint snow on the branches of the trees. This is as easy as picking up some paint with your brush, and placing it on the top part of each branch. Start some of the snowy parts in the middle of the trunk, to give the effect of branches coming toward the foreground.
Remember to leave the bottom parts of the branches bare–the dark colour peeking through will make the painting seem a little more realistic. Also add snow to the biggest of the background trees for some extra realism.


And that’s it!

I hope you enjoyed this post as much as I did. Please give me a follow on Instagram if you want to stay up to date with my artworks, I really appreciate the support. Until next time.
Yolandie


Let’s Chat!