Amid one of the craziest last quarters of the year ever, some genius had the bright idea to make all her holiday gifts. Why? Well. Because ADHD.
I crocheted up a storm, painted hobbit doors on coasters, watercoloured hordes of bookmarks, and prettified notebooks.
And, can you believe it, I even had the foresight to take step-by-step photos of some of these projects!
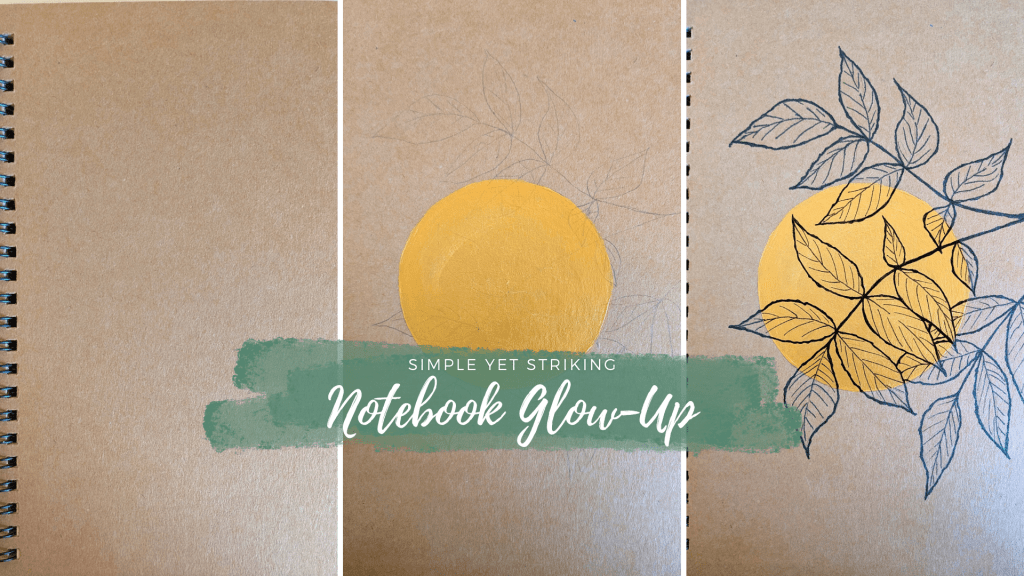
The easiest project of all was this graphic notebook. Not only did it require only 3 art supplies (four if you choose to varnish it afterwards), but it also took less than an hour to complete. Additionally, the design is completely beginner-friendly and can be easily altered to suit any skill level.
Before we get crafty, the usual disclaimer: this is not a sponsored post. I purchased all craft supplies used in the making of this post.
So, without further ado, let’s get crafting!
Supplies:
- A notebook with a blank cover.
- For this post, I used this six-piece set of spiral-bound notebooks from Amazon. The cardboard held up exceptionally well to paint (and a variety of other art supplies in my other projects) without warp or bleed through. I’m really stoked with the quality of this product and will definitely purchase it again.
- Any colour cover will do—in an older tutorial, I used a notebook with a blue cover. The most important thing is that the cover is sturdy, so it won’t warp under paint or allow the pigment to bleed through onto the pages.
- A drawing compass or a pencil and something round to trace.
- Metallic paint. I used a gold by Mont Marte.
- Finally, I used a matte spray-on picture varnish by Pebeo, but this step is completely optional.
Step 1
Draw the circle on the cover.

Step 2
Paint the circle and allow it to dry. I added another layer for opacity, but you might not need a second layer, depending on the paint.


Step 3
Outline your design in pencil. I chose a leaf design because foliage is really easy to draw, but you can substitute it for anything you’d like.
If you’re confident, you can totally fast-forward to the next step, but there is no shame in planning first! Pencilling in the design helps build confidence.


Step 4
Using a fine-liner, ink the lines of your design. I went over the outer edges for extra density. Varying line width will lead the eye and create a more interesting final product.


Step 5 – Optional
I sealed the design with a spray-on varnish, but this step is completely optional. The pen and acrylic paint should both hold up fine on their own.
And that’s it! Simple and striking—the perfect gift for anyone who likes jotting down ideas.


Until next time.
Yolandie


Let’s Chat!